📖
Cerulean Sonar Docs
Docs DirectoryStore
Ethernet ROV Locator
  • ROV Locator
  • Overview
  • General Specifications
  • Quick Start for BlueROV
  • Fundamentals Useful to System Designers
    • Sound Reflection and Absorption
    • Multipath
    • Ping Length
    • What to Do About Multipath and Other Issues
    • Clock Drift Expectations
    • Accuracy Expectations
      • Accuracy Test: Topside GPS
      • Accuracy Test: 110 Meter Slant Range
      • Accuracy Test: 295 Meter Slant Range
    • Operation in a Pool
  • Configuring the ROVLe
    • Finding the Configuration Web Page
    • Example Configuration Web Page
    • Live Status Page
    • Setting Device Type
    • Setting the Static IP Address
    • Setting the Fallback IP Address
    • Setting the MAVLink REST Server Parameters
    • Setting the Secondary (GNSS) MAVLink Interface
    • GPS/GNSS Forwarding (Re-tweeting)
    • Magnetic Declination
    • CIMU Calibration Offsets
    • Speed of Sound
    • GNSS Antenna Mounting Rotation
    • Output Messages
    • Configure Simulation
  • System Variants
  • Autosync
    • Autosync Mission Scenarios and Mission Suitability
    • Autosync Availability
    • Autosync GPS/GNSS Output
    • ROVL Channels (Autosync only; Operating Multiple Units in Proximity)
  • Communicating With the ROVL
    • Serial Parameters
    • The Ethernet Interface
      • Tips on How to Find the IP Address Assigned to Your Ethernet Adapter
      • Blue Robotics Discovery Protocol (Ethernet Only)
    • Packet Format
    • Messages from ROVL to Host
      • $USRTH Receiver-Transmitter Relative Angles Message
      • $USTLC Target Location Message
      • $USINF/$USTXT Information Message
      • $USERR Error Message
      • $USNVM Non-Volatile Memory Message
    • Messages from Host to ROVL
      • NMEA-Format Messages to Receiver
      • Valid Commands from Host to ROVL, Serial and Ethernet
      • Valid Commands from Host to ROVL, Ethernet Only
        • Command: DHCP
        • Command: FALLBACK-ADDRESS
        • Command: IP-ADDRESS
        • Command: HOST-ADDRESS
        • Command: MAVLINK-ADDRESS
        • Command: MAVLINK-AUTO-ORIGIN
        • Command: MAVLINK-SYSID
        • Command: PAUSE
        • Command: RESUME
        • Command: RETWEET-GPS
        • Command: RETWEET-GPS-ADDRESS
        • Command: RETWEET-message
        • Command: SEND-ROV-POS-TO-MAP
        • Command: SEND-TOPSIDE-TO-MAP
        • Command: SEND-USRTH
        • Command: SEND-USTLC
        • Command: UNICAST-TO-ME
  • Cerulean Inertial Measurement Unit (CIMU)
    • CIMU Calibration Background
      • CIMU Magnetometer Calibration
      • CIMU Accelerometer Calibration
      • CIMU Gyro Calibration
  • Operating and Accuracy Considerations
  • Multi-Unit Operation (Swarms)
    • Multi-Unit 1:1
    • Multi-Unit 1:2
    • Multi-Unit 2x1:1
  • ROVL Mounting
    • ROV/Deepside Mounting
    • Topside Mounting
    • Simple Topside Deployment Fixture
  • ROVL Wiring
    • Standard Cabling Options
    • ROVL-e PC Board Internal Connections
      • JST-GH Connector Pin 1 Identification
      • Ethernet/Power Connections
      • Serial Connection
      • USB Connection
      • GNSS Compass Main (4-pin) RS-232 Connection
      • GNSS Compass RTK (2-pin) RS-422 Connection
    • Electrical Noise
  • Connecting and Powering Your ROVLe Ethernet Receiver or Transceiver
    • Example Power Injectors
    • Data Connection
    • Example Power/Wi-Fi Setup for Remote Usage
    • Battery
  • Mounting Dimensions
    • Mk II Receiver with Omnitrack Top
    • Transmitter/Transceiver/Receiver with Standard Top
    • Mk III Transcceiver
    • ROVLe Omnitrack Top
    • ROVLe Standard Top
    • Example Mounting Scheme with 3D-Printed Bracket
  • ROVL Coordinate Systems and Angles
    • Definitions
    • NED or "Compass" vs. ENU or "Math" Angles
    • Math to Compass Frame Conversions
    • Transducer Down Orientation
    • Transducer Up Orientation
    • Receiver/Transceiver Orientation Frames
    • Best Operating Envelope
  • Appendix: Math for Computing Remote Latitude/Longitude
    • Receiver & GPS at Topside and Transmitter Deepside
    • Transmitter & GPS Topside and Receiver Deepside
  • Appendix: Factory Usage Command Set
  • Troubleshooting
    • How to Tell if Your Mk II Receiver is Working
    • How to tell if your Mk II Transmitter is working
    • What to do when you find an unresolvable problem when troubleshooting
  • Copyright
Powered by GitBook
On this page
  1. Troubleshooting

How to Tell if Your Mk II Receiver is Working

This discussion is valid for a Mk II Receiver (serial or USB only). This should be the first step if you are troubleshooting a Mk II system.

PreviousTroubleshootingNextHow to tell if your Mk II Transmitter is working

Last updated 1 month ago

To determine if the receiver is working:

  1. Power up CeruleanTracker.

  2. Go to the "ROVL Rx" tab of the main window.

  3. Check at the bottom of the window and make a note of which active COM ports are detected.

  4. Plug the receiver into the PC using a serial-to-USB cable such as the Cerulean Sonar cable you purchased with your system.

  5. Waiting a few seconds, see what new active COM port appears.

You can plug and unplug the receiver as you are testing, but be aware that sometimes Windows gets confused about what COM ports are active, especially if you are plugging and unplugging multiple devices, and you may need to reboot if the active COM ports list stops updating or you cannot connect to a COM port that you know to be correct.

  1. Make sure the receiver connection is set to the correct COM port. Also make sure the baud rate is set to 115200. There are only rare and obscure reasons to use another baud rate with a receiver, and none of them can be triggered accidentally. See the example below of a connection to COM port 6.
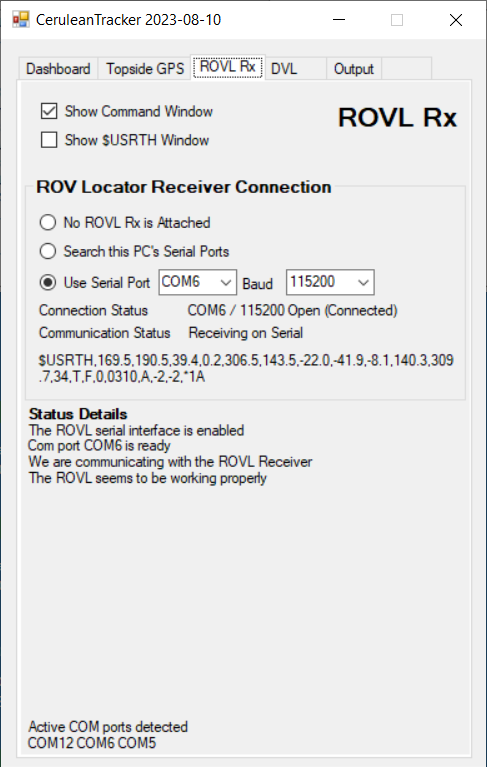
  1. The connection status should change to "Open" with 15 seconds of plugging in the receiver. If you use the "search for" option it may take longer to open. If the status does not change to "open" you need to resolve the problem. Possible issues: bad serial-to-USB converter, Windows is confused as noted above, bad driver (Windows comes with a suitable driver for the Cerulean cable and for the Blue Robotics BLUART), bad cable. Even if the receiver was non-functional for some reason, the connection-open status is determined by the serial-to-USB converter.

  2. A few seconds (fewer than 15) after powering (plugging in) the receiver, and AFTER the connection status changes to "open", the communication status should change to "Receiving on serial" and incoming messages should be displayed below the communication status label. Generally these messages are "$USRTH" messages, and in a bench test, maybe only the last couple of characters will be changing as new messages come in. If this does not happen you need to figure out why before continuing. Most likely this will be a cabling issue.

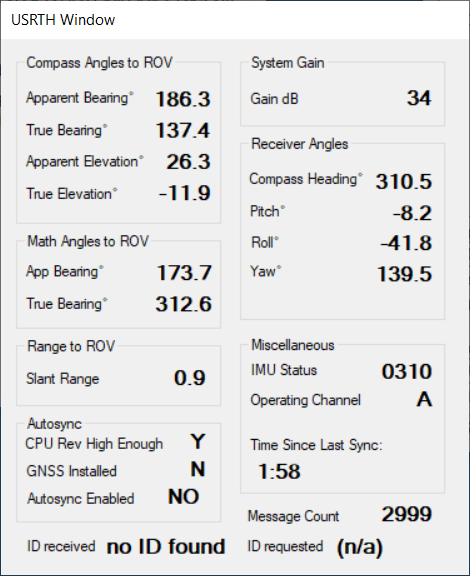
  3. If you check the "show $USRTH window" checkbox, a new window will pop up that decodes the $USRTH messages as they come in. One of the items is a count of messages received. This should be counting up at 1 Hz.
  1. If you check the "show command window" checkbox, a new window will pop up that will display informational messages and help with sending other commands (example below). One feature is the text window that can show progress messages as the receiver boots up. Some of the messages include dates for the firmware, model (in the case, Mk II), some of the non-volatile memory settings such as speed of sound to use), and the IMU connection.
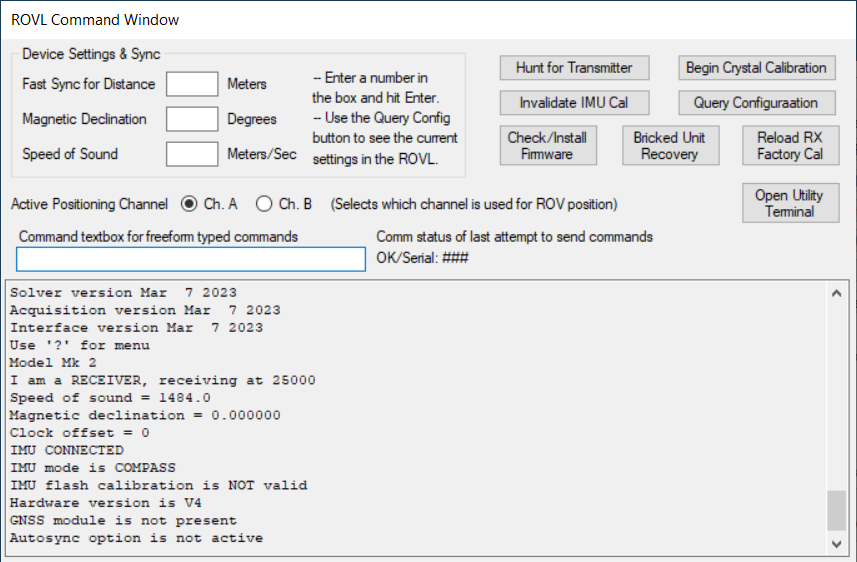
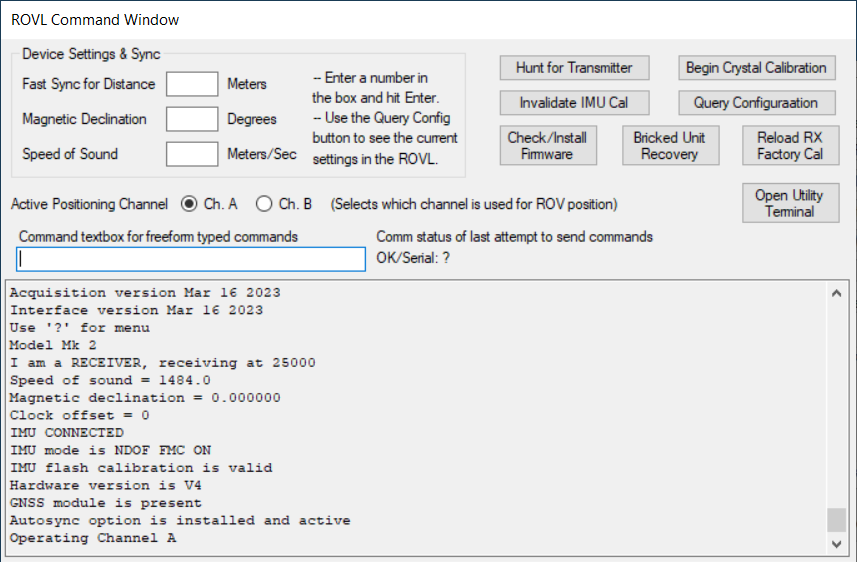
  1. The display may also show unusual errors. Note the final two items: "GNSS module is not present", and "Autosync option is not active". This indicates either this is a very old Mk II (and there are almost none in circulation) or there is a problem with this Mk II receiver. For this specific problem you would need to contact Cerulean Sonar. Most often, the receiver will boot with no problems, as shown below. Note the last line is "Operating Channel A". When troubleshooting this should be the case. If it says something different, send a "IA" ('eye' not 'one') command by typing it into the command textbox (without the quotes) and pressing ENTER.
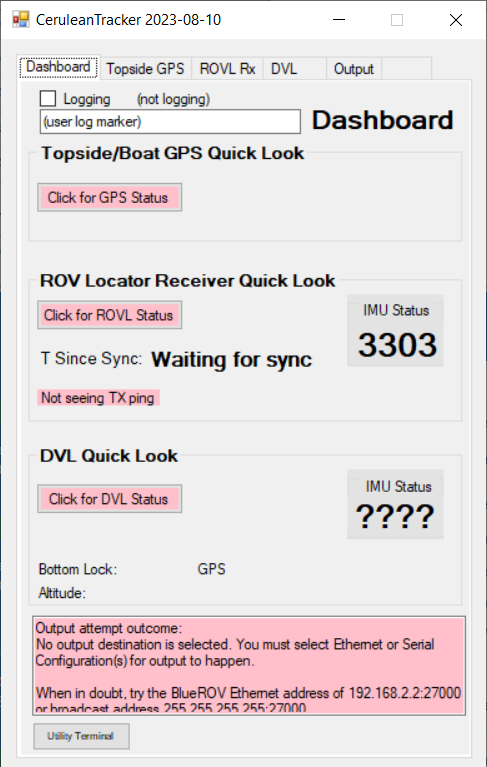
  1. Go back to the Dashboard tab of the main window. It may show something like the example below. Note the "Waiting for sync" status. This indicates the receiver has not yet achieved a GPS lock since it booted. In order to finish troubleshooting the system, the receiver needs to have had a recent GPS lock.
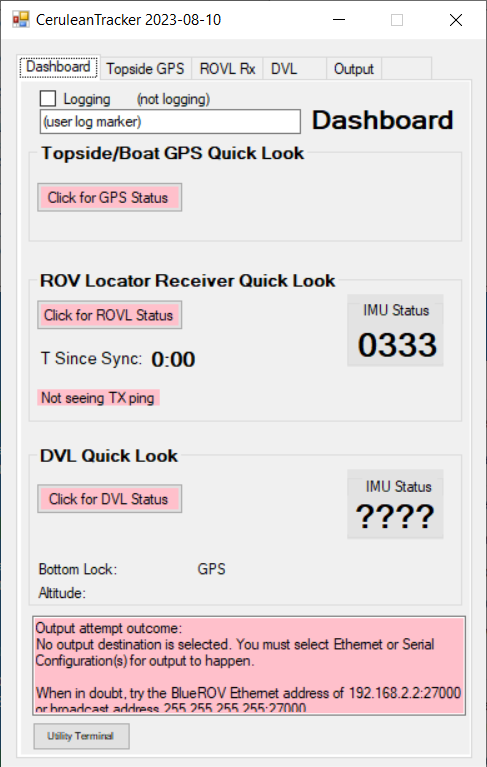
  1. Take the receiver to a place where it can "see" the sky (and is not submerged) and wait for it to achieve GPS lock (typically 30 to 60 seconds). When it does, the "T Since Sync" status will reset to zero. When it loses GPS lock, the time will start counting up. During troubleshooting you should let the receiver re-acquire a lock whenever the time since sync is over 30 minutes.
  1. To determine if the receiver is receiving commands, send a "?" command by typing it into the ROV Command Window command textbox (without the quotes) and pressing ENTER. You should see the text in the text display area update.

Connected to a receiver on COM port 6
USRTH Window
ROVL Command Window showing a missing-GNSS error.
ROVL Command Window showing nominally no errors.
Dashboard tab showing ROVL has not achieved GPS lock and does not have a complete IMU calibration.
Dashboard tab showing ROVL has achieved GPS lock within the last second and does not have a complete IMU calibration.